This post shows how to quickly set up a static website using AWS and Terraform. It is not meant as a thorough explanation of the topic, but rather as a template that you can easily adjust to your own needs.
The full source code for this article is available in this repository.
NOTE: The minimal configuration required by AWS might change over time. If you notice that something is missing, please let me know. You can keep track of all the updates applied to this post in its history.
Content of the website
Let’s start with the resources that you want to host. Create a directory called content, where you will put all the files that your static website consists of. The first of those files will be index.html:
<!DOCTYPE html>
<html lang="en">
<head>
  <meta charset="UTF-8">
  <title></title>
  <link rel="stylesheet" href="style.css">
</head>
<body>
  Hello!
</body>
</html>
As you can see, this is a very limited example: it just displays a “Hello!” message. It also links a stylesheet, so let’s create a file called style.css:
body {
  color: green;
}
This stylesheet changes the color of the font to green, but it also serves another purpose: to prove that multiple files can be uploaded automatically by Terraform and linked between each other.
Terraform and AWS
This template relies on AWS as a provider. Creating an AWS account and generating Terraform credentials is outside the scope of this article, but you can relate to other resources (e.g. Terraform documentation).
After setting up Terraform with AWS, you can proceed with configuring this particular template. Create a file called config.tf:
terraform {
  required_version = "= 1.2.7"
}

provider "aws" {
  region = "eu-central-1"
}
I’ve chosen eu-central-1 as the default region, because I’m located in Germany, but please feel free to use any region that you are close to.
A typical website consists of multiple static files (in this example two), and those files can be added or removed frequently. Taking that into account, this template will automatically upload to S3 everything from the content directory.
However, by default AWS will set the content type of each file in S3 to binary/octet-stream. That results in web browsers trying to download the files, instead of displaying them as a website. To fix this, let’s define content types for different resources (HTML, CSS, JavaScript). Create a file called locals.tf:
locals {
  content_types = {
    ".html" : "text/html",
    ".css" : "text/css",
    ".js" : "text/javascript"
  }
}
This mapping will be used later, to set the content type in S3 based on each file’s extension.
Let’s now proceed with actual AWS resources, which will be configured in a file called main.tf. The first resource is an S3 bucket:
resource "aws_s3_bucket" "bucket" {
  bucket = "pfertyk-test-website"
}
The name of the bucket has to be, unfortunately, unique. It also needs to follow a few other rules, specified in AWS documentation. To increase the chance that nobody else is using the same name, you can e.g. include the name of your website or project (in this case, I’ve added a prefix pfertyk).
Please note that this is the only place where you need to define the name of the bucket. All other AWS resources will refer to it by using aws_s3_bucket.bucket.id.
The next thing to configure is a bucket access block and a bucket policy:
resource "aws_s3_bucket_public_access_block" "bucket_access_block" {
  bucket = aws_s3_bucket.bucket.id

  block_public_acls       = false
  block_public_policy     = false
  ignore_public_acls      = false
  restrict_public_buckets = false
}

resource "aws_s3_bucket_policy" "bucket_policy" {
  depends_on = [aws_s3_bucket_public_access_block.bucket_access_block]
  bucket     = aws_s3_bucket.bucket.id
  policy = jsonencode(
    {
      "Version" : "2012-10-17",
      "Statement" : [
        {
          "Sid" : "PublicReadGetObject",
          "Effect" : "Allow",
          "Principal" : "*",
          "Action" : "s3:GetObject",
          "Resource" : "arn:aws:s3:::${aws_s3_bucket.bucket.id}/*"
        }
      ]
    }
  )
}
Without these resources, S3 files will not be publicly available.
Each file from the content directory will be uploaded as an S3 object:
resource "aws_s3_object" "file" {
  for_each     = fileset(path.module, "content/**/*.{html,css,js}")
  bucket       = aws_s3_bucket.bucket.id
  key          = replace(each.value, "/^content//", "")
  source       = each.value
  content_type = lookup(local.content_types, regex("\\.[^.]+$", each.value), null)
  source_hash  = filemd5(each.value)
}
This piece of code requires a bit more explanation.
The template uses a for_each instruction to loop over all the files in the content directory, creating one aws_s3_object per file. Only .html, .css, and .js extensions are taken into account, because only they have a content type mapping defined in locals.tf. You can expand the list of content types by e.g. images, if you want to include them in your website.
Uploading the files with their original paths would result in a content directory being created in your S3 bucket. To fix that, the template uses replace(each.value, "/^content//", "") to remove the prefix from each file’s path. That way S3 will reflect the actual content of your local directory.
To set the content_type value correctly, the template uses the mapping defined earlier in locals.tf. To extract the extension from each file, regex("\\.[^.]+$", each.value) is used.
To actually host the files as a website, let’s create a website configuration resource:
resource "aws_s3_bucket_website_configuration" "hosting" {
  bucket = aws_s3_bucket.bucket.id

  index_document {
    suffix = "index.html"
  }
}
This configuration is sufficient to host your website publicly. However, S3 is only capable of hosting files via HTTP. To enable HTTPS, one more resource is necessary, so let’s configure a CloudFront distribution:
resource "aws_cloudfront_distribution" "distribution" {
  enabled         = true
  is_ipv6_enabled = true

  origin {
    domain_name = aws_s3_bucket_website_configuration.hosting.website_endpoint
    origin_id   = aws_s3_bucket.bucket.bucket_regional_domain_name

    custom_origin_config {
      http_port                = 80
      https_port               = 443
      origin_keepalive_timeout = 5
      origin_protocol_policy   = "http-only"
      origin_read_timeout      = 30
      origin_ssl_protocols = [
        "TLSv1.2",
      ]
    }
  }

  viewer_certificate {
    cloudfront_default_certificate = true
  }

  restrictions {
    geo_restriction {
      restriction_type = "none"
      locations        = []
    }
  }

  default_cache_behavior {
    cache_policy_id        = "658327ea-f89d-4fab-a63d-7e88639e58f6"
    viewer_protocol_policy = "redirect-to-https"
    compress               = true
    allowed_methods        = ["DELETE", "GET", "HEAD", "OPTIONS", "PATCH", "POST", "PUT"]
    cached_methods         = ["GET", "HEAD"]
    target_origin_id       = aws_s3_bucket.bucket.bucket_regional_domain_name
  }
}
This configuration will redirect all HTTP traffic to HTTPS, and will work for most HTTP request methods.
I’d like to point out that, instead of defining a new cache policy, this template uses one of the managed policies: CachingOptimized, with the ID of 658327ea-f89d-4fab-a63d-7e88639e58f6. This is just one of the policies provided by AWS, you can use a different one if it is better for your needs.
Outputs
Terraform is ready now, but to find out where our website is hosted, you still have to open the AWS console and investigate your newly created resources. To show the address of your website in the terminal, let’s create a file called outputs.tf:
output "website_url" {
  description = "Website URL (HTTPS)"
  value       = aws_cloudfront_distribution.distribution.domain_name
}

output "s3_url" {
  description = "S3 hosting URL (HTTP)"
  value       = aws_s3_bucket_website_configuration.hosting.website_endpoint
}
It will give you access to two values: the HTTPS domain created by CloudFront, and the HTTP address that is provided by S3.
Applying
At this point, the structure of your files should look like this:
├── content
│   ├── index.html
│   └── style.css
├── config.tf
├── locals.tf
├── main.tf
└── outputs.tf
In order to create AWS resources, issue the following commands:
terraform init
terraform plan
The full output of the second command will be long, but it should end with:
Plan: 6 to add, 0 to change, 0 to destroy.

Changes to Outputs:
  + s3_url      = (known after apply)
  + website_url = (known after apply)
If your Terraform plan doesn’t include 6 resources to create and 0 to change or modify, please double-check your configuration.
If the output looks good, all you have to do is apply the changes by running this command and confirming with “yes”:
terraform apply
The entire process might take some time (in my case around 3m35s):
Plan: 6 to add, 0 to change, 0 to destroy.
Changes to Outputs:
+ s3_url = (known after apply)
+ website_url = (known after apply)
Do you want to perform these actions?
Terraform will perform the actions described above.
Only 'yes' will be accepted to approve.
Enter a value: yes
aws_s3_bucket.bucket: Creating...
aws_s3_bucket.bucket: Creation complete after 3s [id=pfertyk-test-website]
aws_s3_bucket_policy.bucket_policy: Creating...
aws_s3_bucket_website_configuration.hosting: Creating...
aws_s3_object.file["content/index.html"]: Creating...
aws_s3_object.file["content/style.css"]: Creating...
aws_s3_bucket_policy.bucket_policy: Creation complete after 1s [id=pfertyk-test-website]
aws_s3_object.file["content/index.html"]: Creation complete after 1s [id=index.html]
aws_s3_object.file["content/style.css"]: Creation complete after 1s [id=style.css]
aws_s3_bucket_website_configuration.hosting: Creation complete after 1s [id=pfertyk-test-website]
aws_cloudfront_distribution.distribution: Creating...
aws_cloudfront_distribution.distribution: Still creating... [10s elapsed]
aws_cloudfront_distribution.distribution: Still creating... [20s elapsed]
aws_cloudfront_distribution.distribution: Still creating... [30s elapsed]
aws_cloudfront_distribution.distribution: Still creating... [40s elapsed]
aws_cloudfront_distribution.distribution: Still creating... [50s elapsed]
aws_cloudfront_distribution.distribution: Still creating... [1m0s elapsed]
aws_cloudfront_distribution.distribution: Still creating... [1m10s elapsed]
aws_cloudfront_distribution.distribution: Still creating... [1m20s elapsed]
aws_cloudfront_distribution.distribution: Still creating... [1m30s elapsed]
aws_cloudfront_distribution.distribution: Still creating... [1m40s elapsed]
aws_cloudfront_distribution.distribution: Still creating... [1m50s elapsed]
aws_cloudfront_distribution.distribution: Still creating... [2m0s elapsed]
aws_cloudfront_distribution.distribution: Still creating... [2m10s elapsed]
aws_cloudfront_distribution.distribution: Still creating... [2m20s elapsed]
aws_cloudfront_distribution.distribution: Still creating... [2m30s elapsed]
aws_cloudfront_distribution.distribution: Still creating... [2m40s elapsed]
aws_cloudfront_distribution.distribution: Still creating... [2m50s elapsed]
aws_cloudfront_distribution.distribution: Still creating... [3m0s elapsed]
aws_cloudfront_distribution.distribution: Still creating... [3m10s elapsed]
aws_cloudfront_distribution.distribution: Still creating... [3m20s elapsed]
aws_cloudfront_distribution.distribution: Still creating... [3m30s elapsed]
aws_cloudfront_distribution.distribution: Creation complete after 3m35s [id=E3LFZRKN8O946N]
Apply complete! Resources: 6 added, 0 changed, 0 destroyed.
Outputs:
s3_url = "pfertyk-test-website.s3-website.eu-central-1.amazonaws.com"
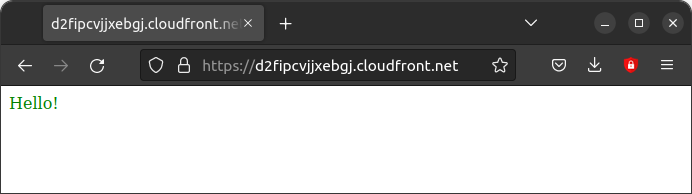
website_url = "d2fipcvjjxebgj.cloudfront.net"
When Terraform is done, you will be presented with two URLs that you can use to access your website. The one from S3 will include the name of your bucket, but the one from CloudFront will be generated randomly. Just open one of them in your browser and you should see your “Hello!” message:
Cleanup
Because AWS resources usually cost money, you might want to remove them after you’re done with testing. To do that, use this command and confirm with “yes”:
terraform destroy
Summary
This template should provide you with a good starting point to easily set up a simple website. You can add more files, each time running terraform plan and terraform apply to update the hosted resources. You can also experiment with other settings, like different cache policies. Finally, you can configure a redirect from your own domain to the one generated by CloudFront (but that is outside the scope of this article).
I hope that this post helped you a bit. If you have any questions, or spot any mistakes, please don’t hesitate to reach out!